
We may earn a commission from links on this page, at no extra cost to you.
A balance board looks simple until you step on one and realize your ankles have opinions of their own. Get the setup right from the first session and you will build genuine stability instead of just surviving each rep.
Set up your space before you step on
Place your board on a non-slip surface, ideally a rubber mat or carpet. Hard floors let the board slide if it contacts the ground at an angle. Stand the board next to a sturdy counter, wall, or squat rack. You are not using it for support on every rep; you are using it so your first instinct when you lose balance is to reach, not to bail sideways onto your ankle.
Foot placement matters more than most guides admit. Center both feet over the pivot point with your feet roughly hip-width apart. Too narrow and the board tips unpredictably; too wide and you lose the lateral challenge that makes the tool useful. Point your toes forward or at a slight outward angle, whichever feels neutral for your hips.
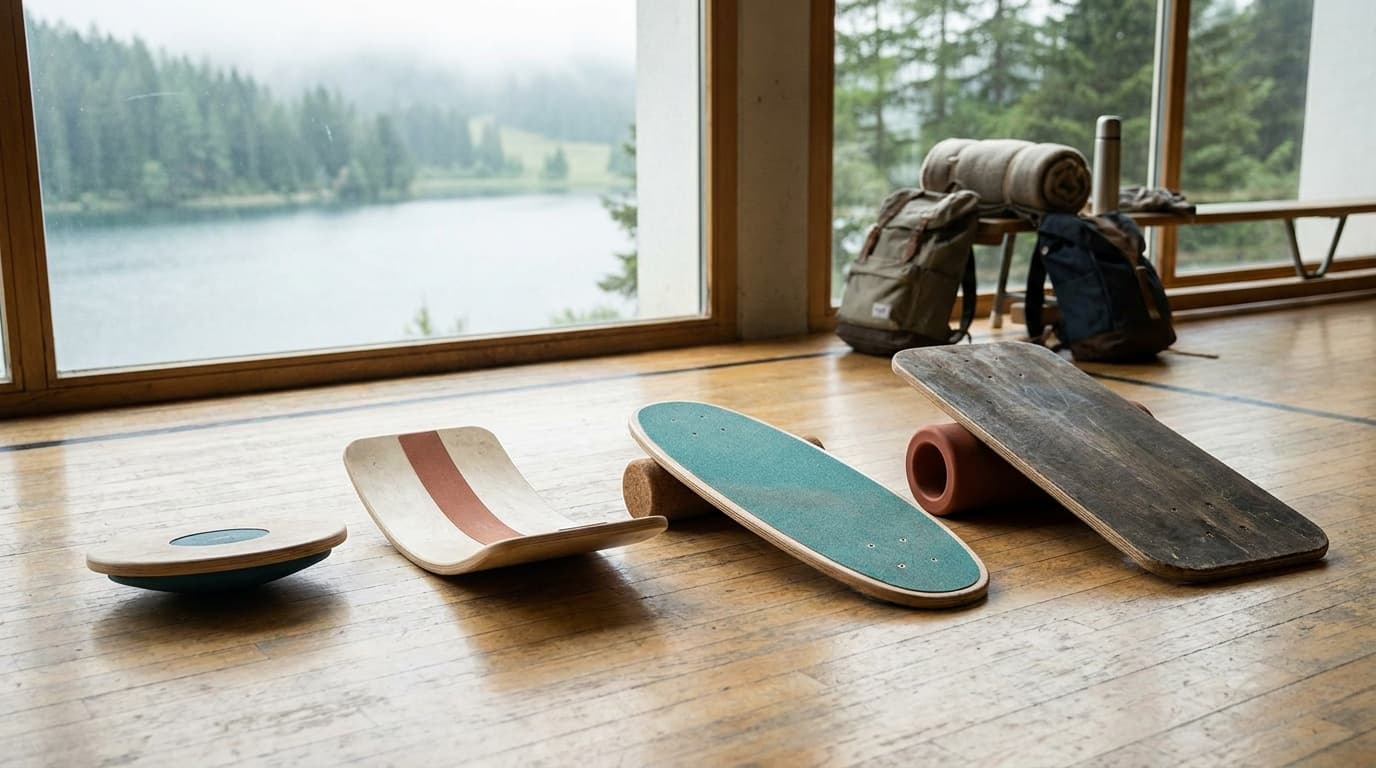
The wobble, rocker, roller progression
Not all balance boards are the same shape, and the order you progress through them matters.
Wobble boards tilt in all directions from a central dome. They are the most forgiving because the dome limits how far you can tilt before the edge contacts the floor. Start here, with a simple model like the Yes4All Wooden Wobble Board.
Rocker boards like the StrongTek Professional Balance Board tilt on a single axis (front-to-back or side-to-side). They feel easier in one plane but demand more deliberate control because you cannot compensate across axes. Move to these once you can hold a wobble board for 60 seconds without touching the support.
Roller boards place a cylinder under a flat platform. The cylinder rolls freely, which removes the tilt-limit safety net entirely. These require genuine ankle and hip stability; the Revbalance 101 v2 is a typical first roller setup. Introduce them only after you are comfortable on a rocker board.
Progression milestones
Wobble board static hold
Stand centered for 60 seconds without touching the wall, two sessions in a row
Wobble board weight shifts
Shift weight heel-to-toe and side-to-side under control for 30 seconds
Rocker board single-axis
Hold the rocker board level on each axis for 45 seconds
Rocker board eyes closed
Repeat the static hold with eyes closed to increase proprioceptive demand
Roller board introduction
Controlled static hold on the roller for 30 seconds before adding any movement
Beginner drills: what to actually do in your first four weeks
Week one is almost entirely static holding. Step onto the board, find your balance point, and hold it. That is the drill. Your nervous system is mapping new proprioceptive input and it needs repetition before it needs complexity.
Once the static hold feels steady, add weight shifts. Slowly move your weight toward your toes, then your heels, then your left foot, then your right. Keep the movement deliberate and slow, about three seconds per shift. This teaches your ankles to fire in a controlled way rather than reacting to a surprise.
From there you can layer in single-leg stands (hold the other foot just off the board surface), knee bends (mini squats on the board), and eventually catch-and-return drills where you let the board touch the floor and immediately return to level.
Ankle rehab progressions
Balance boards have a strong evidence base for ankle rehabilitation after sprains. The research (including work cited in physiotherapy guidelines) consistently shows that proprioceptive training reduces re-sprain rates. But the progression is more conservative than general fitness use.
If you are rehabbing a sprain, get clearance from a physiotherapist before loading the ankle through a full range of motion on the board. The typical rehab sequence starts with a wobble board at reduced tilt, uses both feet, and does not introduce single-leg work until the ankle is pain-free through a full body-weight squat on solid ground. Progress is measured in pain response and swelling, not just balance quality.
For general ankle strengthening in healthy people, the same progression applies but you can move faster through the early stages if you have no pain or instability history.
How long per day and when to stop
More is not better with proprioceptive training. Your nervous system adapts between sessions, not during them. Ten to fifteen minutes of focused balance work is more effective than forty minutes of fatigued wobbling.
Stop a session if you feel ankle or knee pain (distinct from general muscle fatigue), if your form deteriorates significantly, or if you have been standing on the board so long you are compensating by gripping the floor with your toes. Toe gripping is a sign the session is over.
Consistency at ten minutes beats heroics at forty: proprioception is a nervous-system adaptation, and it builds between sessions.
As a general structure, three to five sessions per week produces measurable improvement within four to six weeks for most people. You can use balance board work as a warm-up before lower-body training or as a standalone session on recovery days.
Frequently asked questions
Can I use a balance board every day?
Yes, with appropriate volume. Daily sessions of 10–15 minutes are well within recovery capacity for most people. The caveat is ankle rehab: if you are rehabbing an injury, follow your physiotherapist's prescribed frequency, which may be fewer sessions per week initially to allow tissue adaptation.
Why do my ankles feel sore after balance board training?
Mild muscle soreness in the ankle stabilizers (tibialis anterior, peroneals) is normal in the first one to two weeks, the same way any new resistance exercise produces delayed-onset soreness. Sharp pain, swelling, or pain that persists more than 48 hours is not normal and warrants a rest day and possibly a physiotherapy consult before continuing.
How do I know when to move to a harder board?
Use the milestones in the progression grid above. The reliable signal is two consecutive sessions where you complete your target hold time without touching the support and without compensating through toe gripping or excessive trunk lean. If you are still fighting for balance, the current board is still training you effectively.
For specific picks across all board types and budgets, see our guide to the best balance boards. Browse all fitness guides or read how we research and rate gear.
Recommended gear
Our current top picks from the Best balance boards for adults, rehab, and rola-bola (2026) guide, if you are ready to buy.
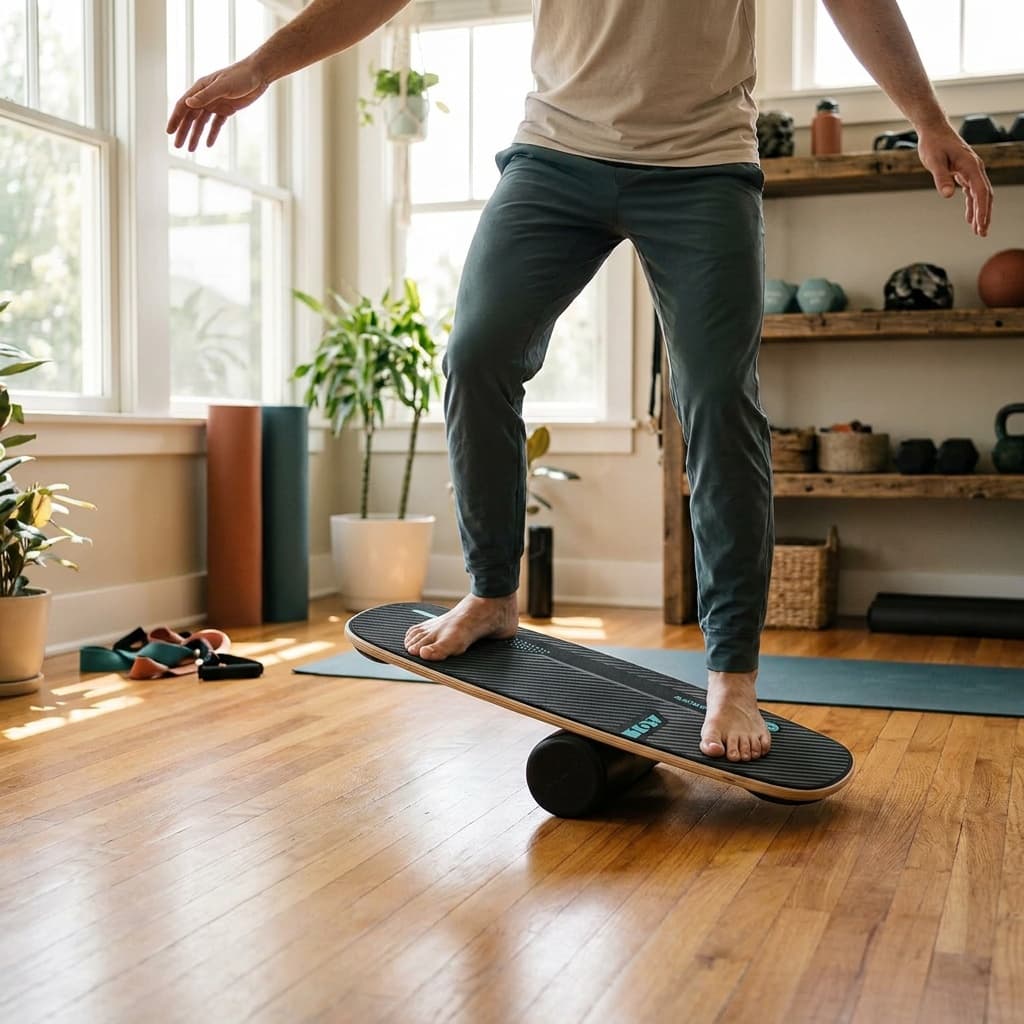
REVBALANCE
Revbalance 101 v2 Balance Board Sports Trainer
- Board dimensions
- 30 in x 12 in
- Type
- Roller board with adjustable magnetic stops
- Deck surface
- DuraSoft traction (no grip tape)
- Weight capacity
- 400 lbs
- Difficulty range
- Beginner to advanced (stops remove for full roll)
- Origin
- Handcrafted in USA, 3-year warranty
A roller-style board with a tool-free magnetic stop system that adjusts the rolling arc in seconds, letting one board serve beginners doing ankle rehab drills and advanced athletes simulating surf and snowboard carves. The DuraSoft deck is comfortable barefoot and floor-safe.
- Magnetic stops make difficulty progression genuinely seamless, no extra purchases required
- 400 lb rated capacity and heavy-duty USA construction back up the lifetime-use claim from most owners
- Roller boards carry a real fall risk for first-timers, so a spotter or nearby wall is advisable on day one
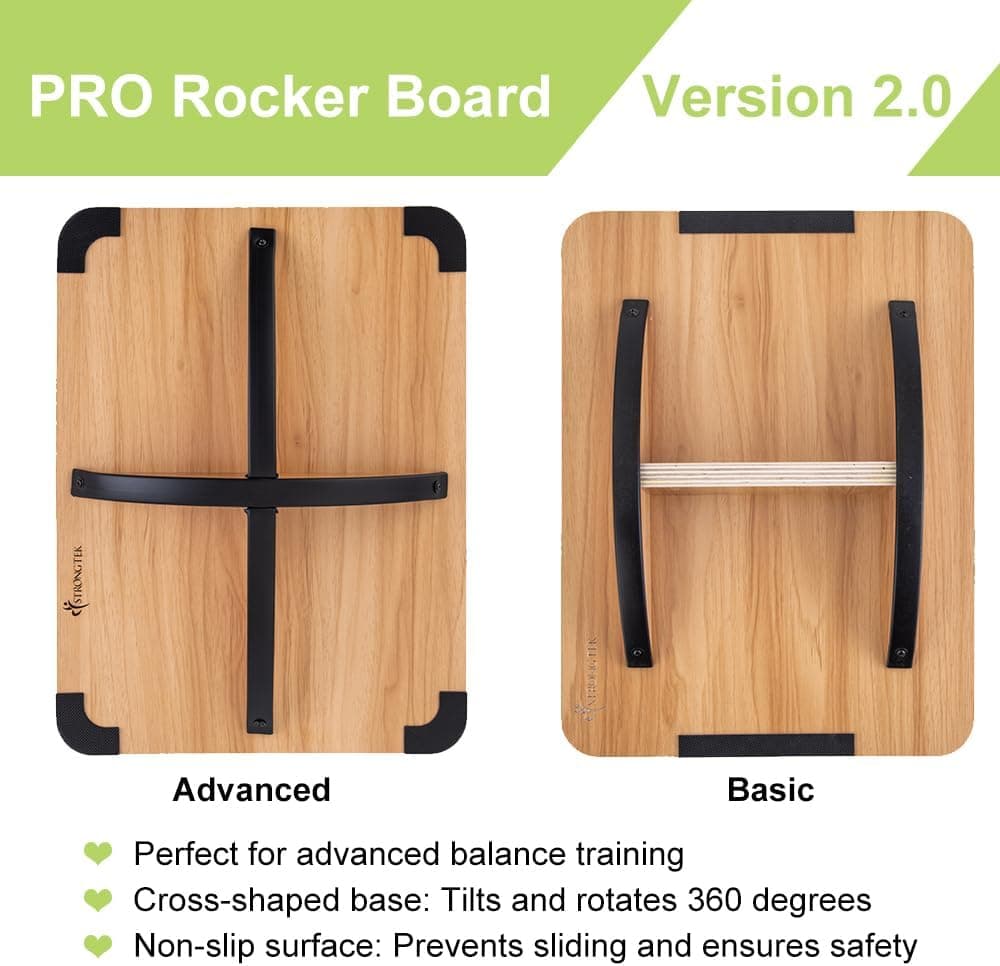
STRONGTEK
StrongTek Professional Wooden Balance Board, Crossed Hardwood Base (Extra Large)
- Board dimensions
- 23.6 in x 15.7 in (extra large)
- Type
- Rocker board with crossed hardwood base, 360-degree tilt
- Deck material
- Lauan hardwood plywood, non-slip surface
- Base construction
- Cross-shaped hardwood base, nail-reinforced (not glue)
- Weight capacity
- 400 lbs
- Best use
- Standing desk, rehab, core training, squat/push-up work
A rocker-style board with a cross-shaped hardwood base that allows multi-directional tilt instead of a single-axis rock, bridging the gap between beginner rocker boards and full wobble boards. The extra-large deck gives plenty of room for standing desk use or rehab exercises.
- Cross base enables 360-degree tilt so users can work all planes without the unpredictability of a free-pivot wobble dome
- Wide deck and solid Lauan construction make it comfortable for extended standing desk sessions and for users with wider stances
- Single-material tilt still has a ceiling for progression: advanced athletes will outgrow it before competitive riders do
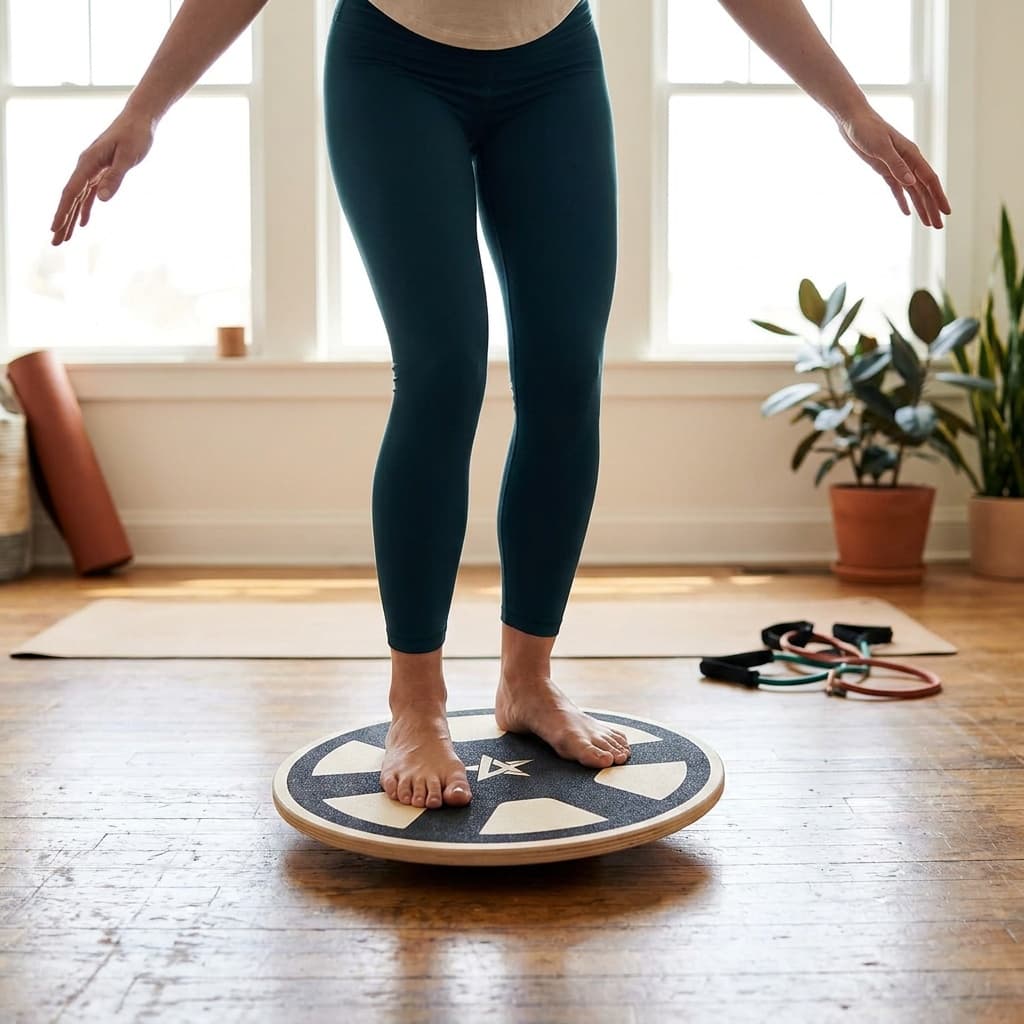
YES4ALL
Yes4All Versatile Wooden Wobble Balance Board (15.75 in)
- Diameter
- 15.75 in round
- Height
- 3 in
- Type
- 360-degree wobble board, domed pivot point
- Deck material
- Solid wood with non-skid surface
- Weight capacity
- 300 lbs
- Weight
- 3 lbs
A simple 360-degree wobble board that tilts in any direction up to roughly 15 degrees, sized for one-foot proprioception drills, ankle rehab protocols, and short standing-desk stints. Lightweight enough to travel and compact enough to keep under a desk.
- Under $25 makes it accessible for anyone starting ankle rehab or physical therapy on a budget
- 360-degree pivot challenges ankle stabilizers in all planes, which is exactly what early proprioception rehab protocols require
- 15.75-inch diameter is tight for larger feet, and the low tilt range limits challenge once basic balance improves
See all picks in Best balance boards for adults, rehab, and rola-bola (2026)
Related guides
Buying guide
Best balance boards for adults, rehab, and rola-bola (2026)
Four rocker, wobble, and roller boards compared for circus and rola-bola practice, standing desks, surf training, and ankle rehab.
Read guide
Field guide
Are balance boards good for you
Balance boards train proprioception, ankle stability, and core control. Here is what the evidence says about who benefits most, realistic expectations, and how to use one effectively.
Read guide
Field guide
Walking workout plan for beginners: a simple 4-week progression
A practical 4-week walking workout plan for beginners: frequency, duration, incline and brisk-interval days, adding a weighted vest, and how to keep progressing after week 4.
Read guide
Buying guide
The best weighted vests for walking, from beginner to budget
The best weighted vests for walking, ranked on fit, comfort, and value, plus a conservative framework for choosing and progressing the load.
Read guideResearched, not personally tested: picks come from specs, verified-owner reviews, and expert sources, scored into the Kit Score. As an Amazon Associate I earn from qualifying purchases. We may earn a commission from links here, at no extra cost to you. How we research →